[References]
Framebuffers and renderbuffers
....
Framebuffers and renderbuffers are another types of OpenGL objects (so they're created the traditional way with functions starting with glGen), that allows us to do off-screen rendering. That means, that you render, but not onto screen, but somewhere on virtual screen, a.k.a framebuffer. After that, you can read the framebuffer contents, most generally produced final 2D image, and you create a texture from that, which you can apply anywhere. So what's a renderbuffer then? The thing is, that framebuffer consists of multiple renderbuffers, and you already know some of them. The default framebuffer (with name 0), which is normal on-screen rendering has a color buffer (storing RGBA), depth buffer (storing pixel depths), then optional stencil buffer and maybe some other buffers. All these sub-buffers are called renderbuffers. So that's how it is - nothing difficult .
....
Working with FrameBuffer
6-Steps:
- Creating Frame-Buffer-Object
to create initially empty texture (using normal glTexImage2D,but with NULL pointer to data ) for FBO.
- glGenFramebuffers(...)
- glBindFramebuffer(GL_FrameBuffer, x);
- Creating A-Texture-for-FBO to copy 2D image into..
before using the FBO, its dimension must be specified, but they don't have to be powers of 2,it will with any numbers as well..
- glTexImage2D(...)
- Adding Depth-Buffer (or Render-Buffer) to the FBO..
glFramebufferTexture2D(<GL_FrameBuffer>, <tells what part of frameBuffer we want this texture to store.
GL_Color_Attachment0 is the framebuffer COLORBUFFER.A FBO can have multiple color attachments, butGL_COLOR_ATTACHMENT0 is default and rendered image is stored there.
Let's get into step 3 - adding depth buffer. It's all in the function AddDepthBuffer. The depth buffer isn't in newly created FBO by default, so we must add it there. Therefore, we create one renderbuffer using function glGenRenderbuffers.
Let's get into step 3 - adding depth buffer. It's all in the function AddDepthBuffer. The depth buffer isn't in newly created FBO by default, so we must add it there. Therefore, we create one renderbuffer using function glGenRenderbuffers.
After that, we bind it (as with all OpenGL objects we're about to work with) and initialize its size and type with:
glRenderbufferStorage(<GL_Renderbuffer>,<renderBuffer type, and here GL_Depth_Component24 goes> ,<renderBuffer's width> ,<renderBuffer's height>);
The last two important parameters are renderbuffer's width and height.These two must match dimension of FBO we want to attach renderBuffer to.
Final step is actual attachment of renderBuffer to FBO using function:
glFramebufferRenderbuffer(<GL_Renderbuffer>, <specifies that we're attching depth buffer>, <GL_RenderBuffer>, <ID of previously generated renderBuffer> );
- Binding the FBO...
- Render the scene off-screen,then copy it to texture.....
- Unbind the FBO,use created textrue anywhere......
Now we're good to proceed with rendering our Avengers scene. We'll render normal way, just like rendering on-screen, but the results are stored in FBO and in its associated texture. This is step 5 and after all the rendering is done, our texture is ready, image is written directly into texture.
The last step is unbinding FBO and returning to normal on-screen rendering. This is done using glBindFramebuffer function with FBO ID 0. Our texture is ready to be mapped anywhere. Notice however, that if you want to use a filtering with mipmaps, you must recalculate them every frame. That's why the function BindFramebufferTexture of our class takes 2 parameters - first is texture unit, and second is whether the mipmaps should be recalculated. I selected mipmap filtering, even trilinear, so the mipmaps must definitely be recalculated.
..
[References]
1. "opengl Framebuffer Objects"
[Refernces]
1. "Shadow Mapping - Part1,"
The results of the 3D pipeline in OpenGL end up in something which is called a 'framebuffer object' (a.k.a FBO).
- This concept wraps within it the color buffer (which is displayed on screen), the depth buffer as well as a few other buffers for additional usages.
- When glutInitDisplayMode() is called it creates the default framebuffer using the specified parameters. This framebuffer is managed by the windowing system and cannot be deleted by OpenGL.
- In addition to the default framebuffer, an application can create FBOs of its own. These objects can be manipulated and used for various techniques under the control of the application.
- The ShadowMapFBO class provides an easy to use interface to a FBO which will be used for the shadow mapping technique. Internally, this class contains two OpenGL handles. The handle 'm_fbo' represents the actual FBO. The FBO encapsulates within it the entire state of the framebuffer. Once this object is created and configured properly we can change framebuffers by simply binding a different object.
- Note that only the default framebuffer can be used to display something on the screen.
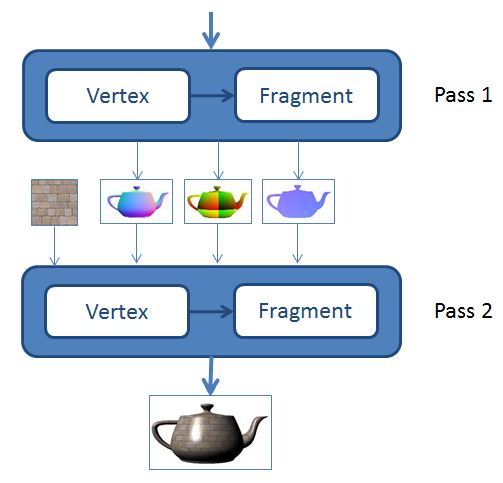
- The framebuffers created by the application can only be used for "offscreen rendering". This can be an intermediate rendering pass (e.g. our shadow mapping buffer) which can later be used for the "real" rendering pass that goes to the screen.
In itself, the framebuffer is just a placeholder.
- To make it usable we need to attach textures to one or more of the available attachment points.
- The textures contain the actual storage space of the framebuffer. OpenGL defines the following attachment points:
- COLOR_ATTACHMENTi - the texture that will be attached here will receive the color that comes out of the fragment shader. The 'i' suffix means that there can be multiple textures attached as color attachments simultaneously. There is a mechanism in the fragment shader that enables rendering into several color buffers at the same time.
- DEPTH_ATTACHMENT - the texture that will be attached here will receive the results of the depth test.
- STENCIL_ATTACHMENT - the texture that will be attached here will serve as the stencil buffer. The stencil buffer enables limiting the area of rasterization and can be used for various techniques.
- DEPTH_STENCIL_ATTACHMENT - this one is simply a combination of depth and stencil buffers as the two are often used together.
For the shadow mapping technique we will only need a depth buffer. The member attribute 'm_shadowMap' is the handle of the texture that will be attached to the DEPTH_ATTACHMENT attachment point. The ShadowMapFBO also provides a couple of methods that will be used in the main render function. We will call BindForWriting() before rendering into the shadow map and BindForReading() when starting the second rendering pass.....
...
No comments:
Post a Comment