
To_Source
1. The nature of light
.
.
.
.
ABSTRACT TYPES OF LIGHT
The following terms describe different types of light that you must know when programming a 3D application which requires a light source. It is important to understand what effect each of these types of light create on the surface of rendered 3D objects.
These effects are more than sufficient for creating incredibly realistic computer graphics.
It would be very time consuming to calculate the real mechanics of light and the way it works in nature so, this common set of light types was generally adopted by OpenGL:
- AMBIENT LIGHT
- DIFFUSE LIGHT
- SPECULAR LIGHT
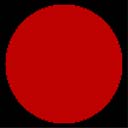
AMBIENT LIGHT

A 3D sphere lit by AMBIENT LIGHT only; appears to look 2D. Ambient light is the average volume of light that is created by emission of light from all of the light sources surrounding (or located inside of) the lit area.
When sun rays pass through the window of a room they hit the walls and are reflected and scattered into all different directions which averagely brightens up the whole room. This visual quality is described by ambient light.
Ambient light alone cannot communicate the complete representation of an object set in 3D space because all vertices are evenly lit by the same color and the object appears to be 2-dimensional as seen in the image above. Although the object displayed is actually a 3D sphere, it appears to be flat on the screen, when lit only by ambient light.
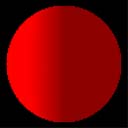
DIFFUSE LIGHT

A diffuse light of red color is cast onto a black object defining its 3D shape.
Diffuse light represents a directional light cast by a light source. Diffuse light can be described as the light that has a position in space and comes from a single direction.
A flashlight held slightly above the lit by it object can be though of as emitting diffuse light. In the image above a light source casting diffuse light of red color is located on the immediate left side of the object. When diffuse light touches the surface of an object, it scatters and reflects evenly across that surface.
To demonstrate how both AMBIENT and DIFFUSE lights work together to create a more-realistic looking object, imagine a 3D sphere with a dark red ambient light spread over it:
Now, by positioning a diffuse light source on the left side of the sphere, we get the following result:
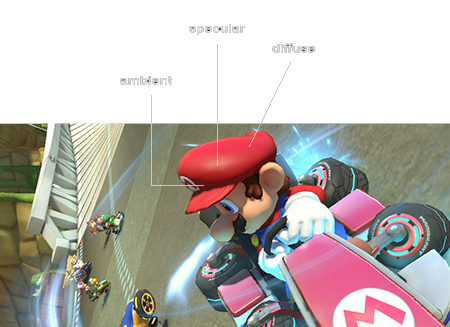
Notice how the sphere now appears to be 3D, rather than a flat circle. By combining the base ambient light and then shining light from a diffuse light source onto an object, we achieve a much more realistic illusion. In order to demonstrate how this technique is used to create realistic images, let's take a look at a screenshot of Toad, the character from Mario Kart 8:

Combining ambient with diffuse light sources is the same principle at work lighting 3D characters in Mario Kart 8. Try to ignore the red polka dot texture, we will cover texture mapping elsewhere in a tutorial on this site.
For now, simply notice how the ambient component of the hat (or is it part of his head?) is white or grayish. This is its base color. And the diffuse light source is projecting a bright white light onto it, supposedly coming from the sun.
There is a lot more going on in Mario Kart 8 graphics engine, visible on this screenshot. But we're not ready to go there yet. For now, let's move on to the next type of light, the specular light, or also sometimes known as specular highlight.
SPECULAR LIGHT
 Specular reflection (or specular highlight) is displayed here in addition to the Ambient and Diffuse layers of light. You can observe how the object's 3D representation is greatly augmented by specular light properties. It's as if we can feel the material the object is made from. This could be a balloon, something plastic, with a smooth surface. The smoother the object is, the more defined this specular highlight will be.
Just like diffuse light, specular light is a directional type of light. It comes from one particular direction. The difference between the two is that specular light reflects off the surface in a sharp and uniform way. The rendering of specular light relies on the angle between the viewer and the light source.
Toad's head is made out of mushroom. So it is not very reflective. But Mario's hat is probably plastic. You can catch a glimpse of the specular highlight on it. Here, this light is not very shiny, and barely visible, but it is indeed there. The shininess of the highlight can be dependent on object's material properties. In order to create a hyper-realistic graphics Nintendo designers decided not to overdo the effect of the specular highlight here, by making it too intense, and dim it down instead:
We can only guess how Nintendo graphics programmers actually generated this effect. I am sure they used shaders, rather than some OpenGL command such as glBegin, glEnd and glVertex (that's the old way of doing things.) But these are the building blocks of light representation on a 3D object, regardless of the API, or technique, the same principles apply.
We have just learned that from the point of the camera (the viewer of the scene) specular light creates a highlighted area on the surface of the viewed object known as specular highlight or specular reflection. The intensity of the specular reflection is dependent on the material the object is made of and the strength of the light source which contains the specular light component.
Object material colors can be imitated by adjusting all 3 components of the light we have just discussed. In addition, graphics programmers combine them with other techniques such as
- texture mapping,
- bump mapping (same as normal mapping,)
- environment mapping (this is when texture of the object is calculated in real time, as a reflection of surroundings represented by a sphere or a cube, commonly for creating highly reflective surfaces such as mirrors, or car bodies) that will add even more detail to the object's surface.
In modern OpenGL most of these effects are now done in a vertex shader or a fragment shader program, usually written and compiled separately from the main code. We will have to go into that elsewhere in a tutorial on this site, as it is a completely separate discussion.
EMISSIVE LIGHT
Emissive light is a little different than any other previously explained light components. The emissive light component is responsible for the object's material's property to reflect or absorb light. When applied to an object's material, emissive light acts to simulate the light that is reflected off the object.
With no additional light sources around, an object's color to which only emissive light component is applied has the same visual quality as an object with only ambient light applied to it. However, the mechanics of how any additional diffuse or specular light reacts with the surface of the same object with only emissive light applied to it is different.
Let's consider an object which emits an average amount of green color. On the image below emissive light component is applied to the sphere. And as you can see, the result is similar to the effect created by applying ambient light to the same sphere in the example above.
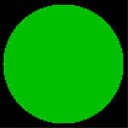
A 3D sphere reflecting green emissive light. The effect is similar to ambient light until additional sources of light are introduced into the scene.
As you already know, a light source can have all of the three components assigned to it which are the ambient light, the diffuse light and the specular light components. Let's see what happens when we apply a light source to the above scene. The light source we are applying has the following properties: red ambient light, red diffuse light and white specular light.
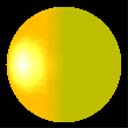
If the above sphere wasn't emitting a light of green color, it would have appeared red in color. However, a green component of emissive light is applied to it. When the light source's "rays" of light hit the sphere's surface, the "source" and "destination" colors merge together producing a yellowish surface. As you know mixing green and red produce yellow.
The specular light component of the light source is white. The center of the specular reflection is white in the center, however as it spreads off it merges with the green and red colors, augmenting on yellow (which is green + red). Again, note that if there were no emissive light applied to the sphere, it would have appeared like the sphere shown under the section SPECULAR LIGHT above, all in red with a white specular reflection.
The way OpenGL shades polygons to simulate light and how light properties are assigned to light sources and materials is explained in the following part of this tutorial.
2. Light in OpenGL
Light there was indeed… but how do we program it in OpenGL? First, let me recite a couple of previously explained functions. I take this straight from the OpenGL tutorial - 2 -Creating an OpenGL Window. But this time I will show you how these functions are used in light programming.
- glEnable(int cap); This function has many uses. It can "enable" many features of OpenGL; the feature you want to enable is specified in the flag cap. In the base code, within InitOpenGL we use this command to enable all kinds of things.
How is this related to light programming? glEnable is used to enable lighting on the whole when you pass GL_LIGHTING parameter to it. gEnable is also responsible for enabling a particular light source in your 3D scene.
This is done by calling glEnable(GL_LIGHTn); where n is the index number of the color you are enabling, ranging from 0 to 7 because OpenGL lets you specify a maximum of eight light sources.
- glDisable(int cap); This function disables whatever properties were previously set with glEnable. glShadeModel(int mode); Selects the polygon shading model. mode is the flag representing the shading mode. This flag can be set to either GL_FLAT or GL_SMOOTH.
GL_SMOOTH shading is the default shading model, causes the computed colors of vertices to be interpolated as the primitive is rasterized, assigning different colors to each resulting pixel fragment. GL_FLAT shading selects the computed color of just one vertex and assigns it to all the pixel fragments generated by rasterizing a single primitive.
In either case, the computed color of a vertex is the result of lighting, if lighting is enabled, or it is the current color at the time the vertex was specified, if lighting is disabled.
No comments:
Post a Comment