[References]
1. "Object Space Normal Mapping with Skeleton Animation Tutorial", BY Jonathan Kreuzer
....
Normal Mapping Tutorial Introduction:
This tutorial will tell you about object space normal mapping of skeletal animated meshes in OpenGL. This is a technique I use in my 3D animator and editor program (3D Kingdoms Creator.) I'm sure plenty of other people have used this technique, but since I haven't seen any tutorials on it, I thought I'd write one myself. The general type of normal mapping described here is now being used in games though I've seen it discussed around 5 years before I wrote this tutorial in 2002. It is a slight possibility I'll add some kind of working demo sample, but to rip and reassemble relevant portions from a megabyte of code is not something I particularly want to do.Please Note:
- This tutorial leaves out some optimizations that I've done, but the code and technique given should still run at a decently fast framerate.
- Also the decisions about what was the easiest way to do something were made with a specific program (now named 3D Kingdoms Creator) in mind, so if you handle the rendering of your skeletally animated models differently than I do, the best way for you to do the calculations involved in object space normal mapping may differ as well.
- Even now I do some skeletal animation a bit different from when I originally wrote this code, I've made some updates, but I'm not sure if everything matches up anymore.
- The code snippets given were taken from a working program, but they were changed for the tutorial, so I wouldn't be surprised if I introduced some bugs.
- This tutorial assumes familiarity with OpenGL and skeletal animation.
- There are some links at the top of the page to brush up on these subjects.
What is Normal Mapping?
Normal-Mapping is a technique used to light a 3D model with a low polygon count as if it were a more detailed model.- It does not actually add any detail to the geometry, so the edges of the model will still look the same, however the interior will look a lot like the high-res model used to generate the normal map.
- The RGB values of each texel in the the normal map represent the x,y,z components of the normalized mesh normal at that texel.
- Instead of using interpolated vertex normals to compute the lighting, the normals from the normal map texture are used. ___________:and so what's the difference between the interpolated-vertex-normals result and normal-map-texture-normals ? Intuitively, the latter gets more pixel-normal-detail. Is this difference caused by the difference of interpolated method and texture2D-sampler ?
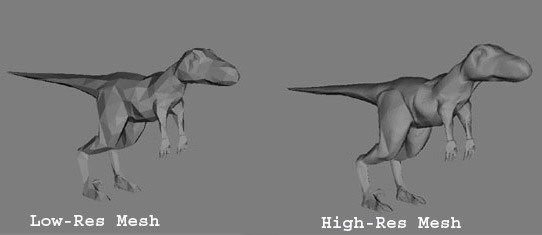
- The low resolution raptor model used for this tutorial has 1100 faces, while the high res model has 20000 faces. Since the high-res model is used only to generate a texture (which I'll refer to as the normal map,) the number of polygons in the high res model is virtually unlimited. However the amount of detail from the high-res model that will be captured by the normal map is limited by the texture's resolution.
- Below is a screenshot of a warrior with plain gouraud shading, and one with normal-mapped shading and specular lighting (he's uniformly shiny because the specular intensity map is in the diffuse texture alpha channel, so not used in this shot.) Also below are the meshes used to generate the raptor normal map in this tutorial.


Object Space and Tangent Space:
Whether using object space or tangent space, normal-mapping with skeletal animation is much the same. The main idea behind using tangent space is going through extra steps to allow the reuse of a normal map texture across multiple parts of the model (storing normals/tangents/binormals at the vertices, and computing the normals of the normal map relative to them, then converting back when rendering. Also, you could use tangent-space to skin a flat bump texture around a model.) See the Tangent Space article for a more detailed description of computing and using these vectors. By writing a tutorial on object space, I'm not saying object space is better. However it does have some advantages, and is certainly a usable approach. I only use object space for normal maps generated from a high-res mesh, but I use tangent space for bump-mapping on levels. Below are a few of my personal thoughts on the two methods for those interested, but be aware that there are some tricks or different ways to do things with any method.
Advantages to using Object Space :
It's simpler to implement and I find it more straightforward to think about. The normal map contains the normals pointing in their actual directions (for an unrotated model at least.) You get to forget about per vertex normals, tangents, and binormals ( which I'll call n/t/b for short. ) This means less initial calculations, and you don't have to worry about poorly behaved n/t/b causing distortion. It's also slightly faster because you don't have to rotate the n/t/b with your model, or convert light vectors to tangent space. Level of detail algorithms or anything else that reduces and changes the vertices in your model can easily run fine. (In tangent space the changing n/t/b interpolations caused by removed vertices would probably distort the mesh normals, although I'm not sure if it will be noticeable. ) Object space may have less noticeable seems at texture uv boundaries than tangent space, but this depends greatly on the meshes and implementation.Disadvantages (as opposed to Tangent Space) :
You can't reuse texture coordinates for symmetric parts of the model. If you had a model that is completely symmetric along an axis, and 1 MB normal map, that means 0.5 MBs of it is redundant information. If this bothers you, keep in mind this is only for something rendered as one piece. In the case mentioned above you could render the model in two halves, each using the same normal map, but one rendered with the light vector x component reversed ( or y or z depending on the axis of symmetry. ) Which is a tiny bit of extra work, but this is what I do myself. (My skeletal meshes have always had a chunk system, and flags settable per chunk, so flip x,y,z can be set to re-use parts of the texture.)Another main disadvantage to not using tangent space is that you can't use a detail normal map for fine close-up detail in addition to the one that approximates the high resolution mesh. (You can add details into the object space normal map when generating it, however, a detail normal map would be highly repeating, thus offering much greater resolution than just using the one normal map.)
Also Tangent Space normal maps can be more easily compressed by storing only the X,Y channels. Since the normals are unit vectors, and the Z channel is always in the same direction, the Z channel can be computed this way:
Normal.z = sqrt( 1.0 - Normal.x*Normal.x - Normal.y*Normal.y );
A small issue to be aware of is that using mipmaping with normal maps can sometimes cause visible seems when downsampling causes the uv coordinates to align improperly with the texture. To fix this you can extend the edges on the normal map texture, or use fewer or no mipmaps. In tangent space mis-aligned UVs don't matter as much, since the texture is mostly blue (z-component).
_______________________
.......
.......
.......
_______________________
Appendix (Per Pixel Normalization):
With the dot product, the magnitude of the vectors (normal & light vector) control the magnitude of the scalar output (brightness).- If one of these is shorter than the unit vector, then it will result in smaller output, and thus darker lighting.
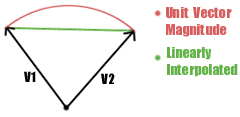
- The darker spots are because linearly averaging two unit vectors, as is done with the light vector between vertices, or the normal map between texels, results in a vector of reduced magnitude.
- The greater the angle between the two vectors, the smaller the magnitude of the averaged vector, with 180 degree vectors cancelling out completely.
- The curve followed by normalized interpolation between unit vectors (labelled V1 and V2), and the line followed by linear interpolation are illustrated below.

- Now there is a question as to how noticeable this is in your program. If it's not very noticable then you can ignore per-pixel normalization. (How noticable depends on a lot of factors. A more tessellated model, or a higher resolution normal map, means less interpolation. More detailed/grainy diffuse textures hide lighting artifacts. Strong specular highlights make the unnormalization much more noticable. It also depends on how closely the model will likely be viewed, etc.)
- Interpolating vectors between vertices is handled by the graphics card, but the vectors can still be renormalized at the cost of extra operation(s).
- Now, the newer graphics cards provide a normalization function on the GPU that is reasonably fast, though it still will result in a slower fill rate. Whether it's almost free or noticeably slower depends on the graphics card.
This gives a very general overview of using a normalization cubemap: http://developer.nvidia.com/view.asp?IO=perpixel_lighting_intro
_________________________
No comments:
Post a Comment