By the way, renderbuffer object is a new type of storage object defined in GL_ARB_framebuffer_object extension. It is used as a rendering destination for a single 2D image during rendering process.
The following diagram shows the connectivity among the framebuffer object, texture object and renderbuffer object. Multiple texture objects or renderbuffer objects can be attached to a framebuffer object through the attachment points.
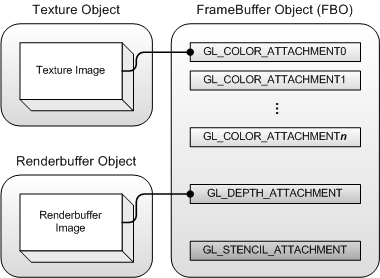
There are multiple color attachment points (GL_COLOR_ATTACHMENT0,..., GL_COLOR_ATTACHMENTn), one depth attachment point (GL_DEPTH_ATTACHMENT), and one stencil attachment point (GL_STENCIL_ATTACHMENT) in a framebuffer object. The number of color attachment points is implementation dependent, but each FBO must have at least one color attachement point. You can query the maximum number of color attachement points with GL_MAX_COLOR_ATTACHMENTS, which are supported by a graphics card. The reason that a FBO has multiple color attachement points is to allow to render the color buffer to multiple destinations at the same time. This "multiple render targets" (MRT) can be accomplished byGL_ARB_draw_buffers extension. Notice that the framebuffer object itself does not have any image storage(array) in it, but, it has only multiple attachment points.
Framebuffer object (FBO) provides an efficient switching mechanism; detach the previous framebuffer-attachable image from a FBO, and attach a new framebuffer-attachable image to the FBO. Switching framebuffer-attachable images is much faster than switching between FBOs. FBO provides glFramebufferTexture2D() to switch 2D texture objects, and glFramebufferRenderbuffer() to switch renderbuffer objects.
...
Creating Frame Buffer Object (FBO)
glGenFramebuffers()
void glGenFramebuffers(GLsizei n, GLuint* ids)
void glDeleteFramebuffers(GLsizei n, const GLuint* ids)
glGenFramebuffers() requires 2 parameters; the first one is the number of framebuffers to create, and the second parameter is the pointer to a GLuint variable or an array to store a single ID or multiple IDs. It returns the IDs of unused framebuffer objects. ID 0 means the default framebuffer, which is the window-system-provided framebuffer.
And, FBO may be deleted by calling glDeleteFramebuffers() when it is not used anymore.
glBindFramebuffer()
Once a FBO is created, it has to be bound before using it.
void glBindFramebuffer(GLenum target, GLuint id)
The first parameter, target, should be GL_FRAMEBUFFER, and the second parameter is the ID of a framebuffer object. Once a FBO is bound, all OpenGL operations affect onto the current bound framebuffer object. The object ID 0 is reserved for the default window-system provided framebuffer. Therefore, in order to unbind the current framebuffer (FBO), use ID 0 in glBindFramebuffer().
Renderbuffer Object
In addition, renderbuffer object is newly introduced for offscreen rendering. It allows to render a scene directly to a renderbuffer object, instead of rendering to a texture object. Renderbuffer is simply a data storage object containing a single image of a renderable internal format. It is used to store OpenGL logical buffers that do not have corresponding texture format, such as stencil or depth buffer.
glGenRenderbuffers()
void glGenRenderbuffers(GLsizei n, GLuint* ids)
void glDeleteRenderbuffers(GLsizei n, const Gluint* ids)
Once a renderbuffer is created, it returns non-zero positive integer. ID 0 is reserved for OpenGL.
glBindRenderbuffer()
void glBindRenderbuffer(GLenum target, GLuint id)
Same as other OpenGL objects, you have to bind the current renderbuffer object before referencing it. The target parameter should be GL_RENDERBUFFER for renderbuffer object.
glRenderbufferStorage()
void glRenderbufferStorage(GLenum  target,
                           GLenum  internalFormat,
                           GLsizei width,
                           GLsizei height)
When a renderbuffer object is created, it does not have any data storage, so we have to allocate a memory space for it. This can be done by using glRenderbufferStorage(). The first parameter must be GL_RENDERBUFFER. The second parameter would be color-renderable (GL_RGB, GL_RGBA, etc.), depth-renderable (GL_DEPTH_COMPONENT), or stencil-renderable formats (GL_STENCIL_INDEX). The width and height are the dimension of the renderbuffer image in pixels.
The width and height should be less than GL_MAX_RENDERBUFFER_SIZE, otherwise, it generates GL_INVALID_VALUE error.
glGetRenderbufferParameteriv()
void glGetRenderbufferParameteriv(GLenum target,
                                  GLenum param,
                                  GLint* value)
You also get various parameters of the currently bound renderbuffer object. target should be GL_RENDERBUFFER, and the second parameter is the name of parameter. The last is the pointer to an integer variable to store the returned value. The available names of the renderbuffer parameters are;
GL_RENDERBUFFER_WIDTH
GL_RENDERBUFFER_HEIGHT
GL_RENDERBUFFER_INTERNAL_FORMAT
GL_RENDERBUFFER_RED_SIZE
GL_RENDERBUFFER_GREEN_SIZE
GL_RENDERBUFFER_BLUE_SIZE
GL_RENDERBUFFER_ALPHA_SIZE
GL_RENDERBUFFER_DEPTH_SIZE
GL_RENDERBUFFER_STENCIL_SIZE
Attaching images to FBO
FBO itself does not have any image storage(buffer) in it. Instead, we must attach framebuffer-attachable images (texture or renderbuffer objects) to the FBO. This mechanism allows that FBO quickly switch (detach and attach) the framebuffer-attachable images in a FBO. It is much faster to switch framebuffer-attachable images than to switch between FBOs. And, it saves unnecessary data copies and memory consumption. For example, a texture can be attached to multiple FBOs, and its image storage can be shared by multiple FBOs.
Attaching a 2D texture image to FBO
glFramebufferTexture2D(GLenum target,
                       GLenum attachmentPoint,
                       GLenum textureTarget,
                       GLuint textureId,
                       GLint  level)
glFramebufferTexture2D() is to attach a 2D texture image to a FBO. The first parameter must be GL_FRAMEBUFFER, and the second parameter is the attachment point where to connect the texture image. A FBO has multiple color attachment points (GL_COLOR_ATTACHMENT0, ..., GL_COLOR_ATTACHMENTn), GL_DEPTH_ATTACHMENT, and GL_STENCIL_ATTACHMENT. The third parameter, "textureTarget" is GL_TEXTURE_2D in most cases. The fourth parameter is the identifier of the texture object. The last parameter is the mipmap level of the texture to be attached.
If the textureId parameter is set to 0, then, the texture image will be detached from the FBO. If a texture object is deleted while it is still attached to a FBO, then, the texture image will be automatically detached from the currently bound FBO. However, if it is attached to multiple FBOs and deleted, then it will be detached from only the bound FBO, but will not be detached from any other un-bound FBOs.
Attaching a Renderbuffer image to FBO
void glFramebufferRenderbuffer(GLenum target,
                               GLenum attachmentPoint,
                               GLenum renderbufferTarget,
                               GLuint renderbufferId)
A renderbuffer image can be attached by calling glFramebufferRenderbuffer(). The first and second parameters are same as glFramebufferTexture2D(). The third parameter must be GL_RENDERBUFFER, and the last parameter is the ID of the renderbuffer object.
If renderbufferId parameter is set to 0, the renderbuffer image will be detached from the attachment point in the FBO. If a renderbuffer object is deleted while it is still attached in a FBO, then it will be automatically detached from the bound FBO. However, it will not be detached from any other non-bound FBOs.
Checking FBO Status
Once attachable images (textures and renderbuffers) are attached to a FBO and before performing FBO operation, you must validate if the FBO status is complete or incomplete by using glCheckFramebufferStatus(). If the FBO is not complete, then any drawing and reading command (glBegin(), glCopyTexImage2D(), etc) will be failed.
GLenum glCheckFramebufferStatus(GLenum target)
glCheckFramebufferStatus() validates all its attached images and framebuffer parameters on the currently bound FBO. And, this function cannot be called within glBegin()/glEnd() pair. The target parameter should be GL_FRAMEBUFFER. It returns non-zero value after checking the FBO. If all requirements and rules are satisfied, then it returns GL_FRAMEBUFFER_COMPLETE. Otherwise, it returns a relevant error value, which tells what rule is violated.
The rules of FBO completeness are:
- The width and height of framebuffer-attachable image must be not zero.
- If an image is attached to a color attachment point, then the image must have a color-renderable internal format. (GL_RGBA, GL_DEPTH_COMPONENT, GL_LUMINANCE, etc)
- If an image is attached to GL_DEPTH_ATTACHMENT, then the image must have a depth-renderable internal format. (GL_DEPTH_COMPONENT, GL_DEPTH_COMPONENT24, etc)
- If an image is attached to GL_STENCIL_ATTACHMENT, then the image must have a stencil-renderable internal format. (GL_STENCIL_INDEX, GL_STENCIL_INDEX8, etc)
- FBO must have at least one image attached.
- All images attached a FBO must have the same width and height.
- All images attached the color attachment points must have the same internal format.
Note that even though all of the above conditions are satisfied, your OpenGL driver may not support some combinations of internal formats and parameters. If a particular implementation is not supported by OpenGL driver, then glCheckFramebufferStatus() returns GL_FRAMEBUFFER_UNSUPPORTED.
The
sample code provides some utility functions to report the information of the current FBO; printFramebufferInfo() and checkFramebufferStatus().
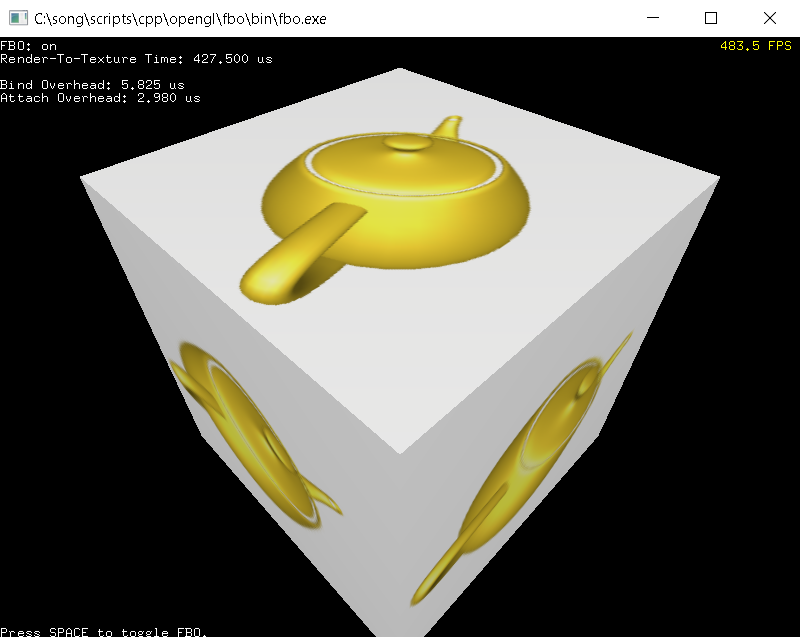
Example: Render To Texture
Download the source and binary:
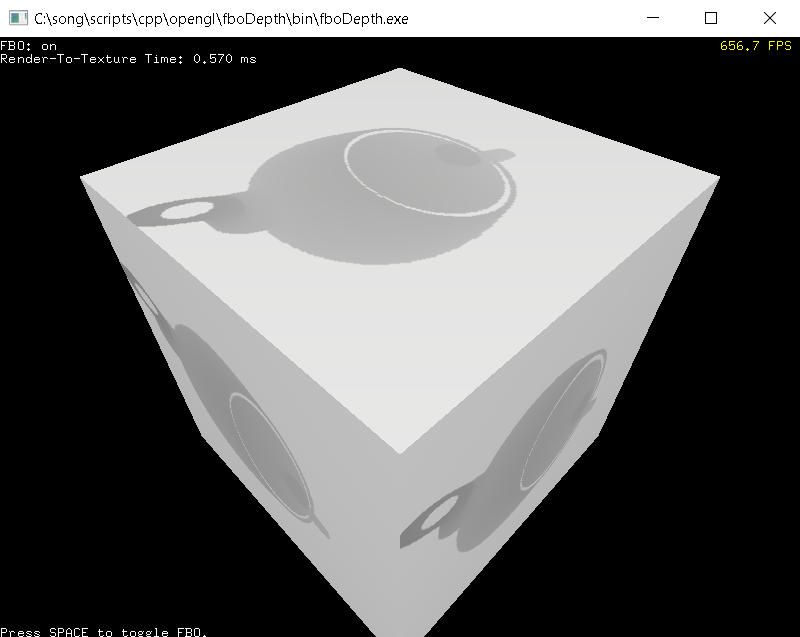
fbo.zip (Updated: 2014-05-03)Extras:- Rendering to the depth buffer only:
fboDepth.zip- Rendering the outlines of an object using stencil buffer:
fboStencil.zip- Bliting between 2 FBOs using
glBlitFramebuffer():
fboBlit.zip
Sometimes, you need to generate dynamic textures on the fly. The most common examples are generating mirroring/reflection effects, dynamic cube/environment maps and shadow maps. Dynamic texturing can be accomplished by rendering the scene to a texture. A traditional way of render-to-texture is to draw a scene to the framebuffer as normal, and then copy the framebuffer image to a texture by using glCopyTexSubImage2D().
Using FBO, we can render a scene directly onto a texture, so we don't have to use the window-system-provided framebuffer at all. Further more, we can eliminate an additional data copy (from framebuffer to texture).
This demo program performs render to texture operation with/without FBO, and compares the performance difference. Other than performance gain, there is another advantage of using FBO. If the texture resolution is larger than the size of the rendering window in traditional render-to-texture mode (without FBO), then the area out of the window region will be clipped. However, FBO does not suffer from this clipping problem. You can create a framebuffer-renderable image larger than the display window.
The following codes is to setup a FBO and framebuffer-attachable images before the rendering loop is started. Note that not only a texture image is attached to the FBO, but also, a renderbuffer image is attached to the depth attachment point of the FBO. We do not actually use this depth buffer, however, the FBO itself needs it for depth test. If we don't attach this depth renderable image to the FBO, then the rendering output will be corrupted because of missing depth test. If stencil test is also required during FBO rendering, then additional renderbuffer image should be attached to GL_STENCIL_ATTACHMENT.
...
GLuint textureId;
glGenTextures(1, &textureId);
glBindTexture(GL_TEXTURE_2D, textureId);
glTexParameterf(GL_TEXTURE_2D, GL_TEXTURE_MAG_FILTER, GL_LINEAR);
glTexParameterf(GL_TEXTURE_2D, GL_TEXTURE_MIN_FILTER, GL_LINEAR_MIPMAP_LINEAR);
glTexParameterf(GL_TEXTURE_2D, GL_TEXTURE_WRAP_S, GL_CLAMP_TO_EDGE);
glTexParameterf(GL_TEXTURE_2D, GL_TEXTURE_WRAP_T, GL_CLAMP_TO_EDGE);
glTexParameteri(GL_TEXTURE_2D, GL_GENERATE_MIPMAP, GL_TRUE);
glTexImage2D(GL_TEXTURE_2D, 0, GL_RGBA8, TEXTURE_WIDTH, TEXTURE_HEIGHT, 0,
GL_RGBA, GL_UNSIGNED_BYTE, 0);
glBindTexture(GL_TEXTURE_2D, 0);
GLuint rboId;
glGenRenderbuffers(1, &rboId);
glBindRenderbuffer(GL_RENDERBUFFER, rboId);
glRenderbufferStorage(GL_RENDERBUFFER, GL_DEPTH_COMPONENT,
TEXTURE_WIDTH, TEXTURE_HEIGHT);
glBindRenderbuffer(GL_RENDERBUFFER, 0);
GLuint fboId;
glGenFramebuffers(1, &fboId);
glBindFramebuffer(GL_FRAMEBUFFER, fboId);
glFramebufferTexture2D(GL_FRAMEBUFFER,
GL_COLOR_ATTACHMENT0,
GL_TEXTURE_2D,
textureId,
0);
glFramebufferRenderbuffer(GL_FRAMEBUFFER,
GL_DEPTH_ATTACHMENT,
GL_RENDERBUFFER,
rboId);
GLenum status = glCheckFramebufferStatus(GL_FRAMEBUFFER);
if(status != GL_FRAMEBUFFER_COMPLETE)
fboUsed = false;
glBindFramebuffer(GL_FRAMEBUFFER, 0);
...
The rendering procedure of render-to-texture is almost same as normal drawing. We only need to switch the rendering destination from the window-system-provided to the non-displayable, application-created framebuffer (FBO).
...
glBindFramebuffer(GL_FRAMEBUFFER, fboId);
glClear(GL_COLOR_BUFFER_BIT | GL_DEPTH_BUFFER_BIT);
draw();
glBindFramebuffer(GL_FRAMEBUFFER, 0);
glBindTexture(GL_TEXTURE_2D, textureId);
glGenerateMipmap(GL_TEXTURE_2D);
glBindTexture(GL_TEXTURE_2D, 0);
...
Note that glGenerateMipmap() is also included as part of FBO extension in order to generate mipmaps explicitly after modifying the base level texture image. If GL_GENERATE_MIPMAP is set to GL_TRUE, then glTex{Sub}Image2D() and glCopyTex{Sub}Image2D() trigger automatic mipmap generation (in OpenGL version 1.4 or greater). However, FBO operation does not generate its mipmaps automatically when the base level texture is modified because FBO does not call glCopyTex{Sub}Image2D() to modify the texture. Therefore, glGenerateMipmap() must be explicitly called for mipmap generation.
If you need to a post processing of the texture, it is possible to combine with
Pixel Buffer Object (PBO) to modify the texture efficiently.
...